
Getting started with Python
This tutorial covers how to start loading our API from scratch with Python. It guides complete Python beginners on how to download and get Python running, and then how to call data from the Modo Energy API.
We will walk through the fundamental must-haves to use Python:
- Python installed,
- A package manager,
- Some way of editing and running code. We use
jupyter lab- but you might choose a different Integrated Development Environment, or IDE.
There are lots of ways to get started with Python. In this tutorial, we walk through using Miniconda to set up Python and its required packages
Jupyter Lab allows us to run code using a Jupyter Notebook, which works great for querying an API. A Jupyter Notebook - or a file ending with ".ipynb" - allows you to run through blocks (or a few lines) of code individually and keeps the results in memory, which you can then save to a file (for example).
If you have another way of using Python, don't worry - skip to step 5, ensure you can run Jupyter Notebooks, and have a go from there.
1. Install Miniconda to get python
Miniconda is a package manager and installer for Python, based on the more multipurpose Anaconda. To install Miniconda, follow the instructions depending on your operating system (Mac, Windows or Linux).
2. Check you have python
Installing Miniconda should have installed python. Check this by typing python --version into your terminal (MacOS) or Anaconda Prompt (Windows).
If something like Python 3.11.5 appears (or similar 3.x), great! You've got python and a package manager.
If not, return conda install python into the command line, and then check that you have it again with python --version.
3. Install the required packages for calling an API
First, install pip - this is another package manager. It (along with conda allows you to install libraries you'll need). It should have been installed along with your python install - run these commands to check.
Now, install the required packages for accessing and running an API in Python. Do this by running these commands into your command line:
conda install requests
This package enables you to call APIs.
conda install pandas
This enables you to use the pandas package, which is you can use to handle tables of data - known as dataframes. All dependencies will be installed along with it, so it might take few minutes.
pip install jupyterlab
This installs Jupyter Lab, which allows you to run Jupyter Notebooks on other IDEs, but also is an IDE itself.
In the future, if you need more packages, use the command line and
conda install xxto install them. If this doesn't work, trypip install xxinstead. Then, refresh your code and get going with your new package. Conda is preferable as it manages package incompatibilities and versions within itself. However, it doesn't have that many libraries in it - pip does, so is more often used.
4. Get Jupyter Lab up and running
You might want to create a new folder on your computer to work in. I've called mine 'API_test'. Navigate to this folder, via the command line. You can do this either by typing
cd API_test
into the command line, or navigating to the folder on your file system and opening a terminal or anaconda prompt from there using a right-click.
In your command line (terminal on MacOS or Anaconda Prompt on Windows), enter jupyter lab.
Select 'Python 3' under 'Notebook'.
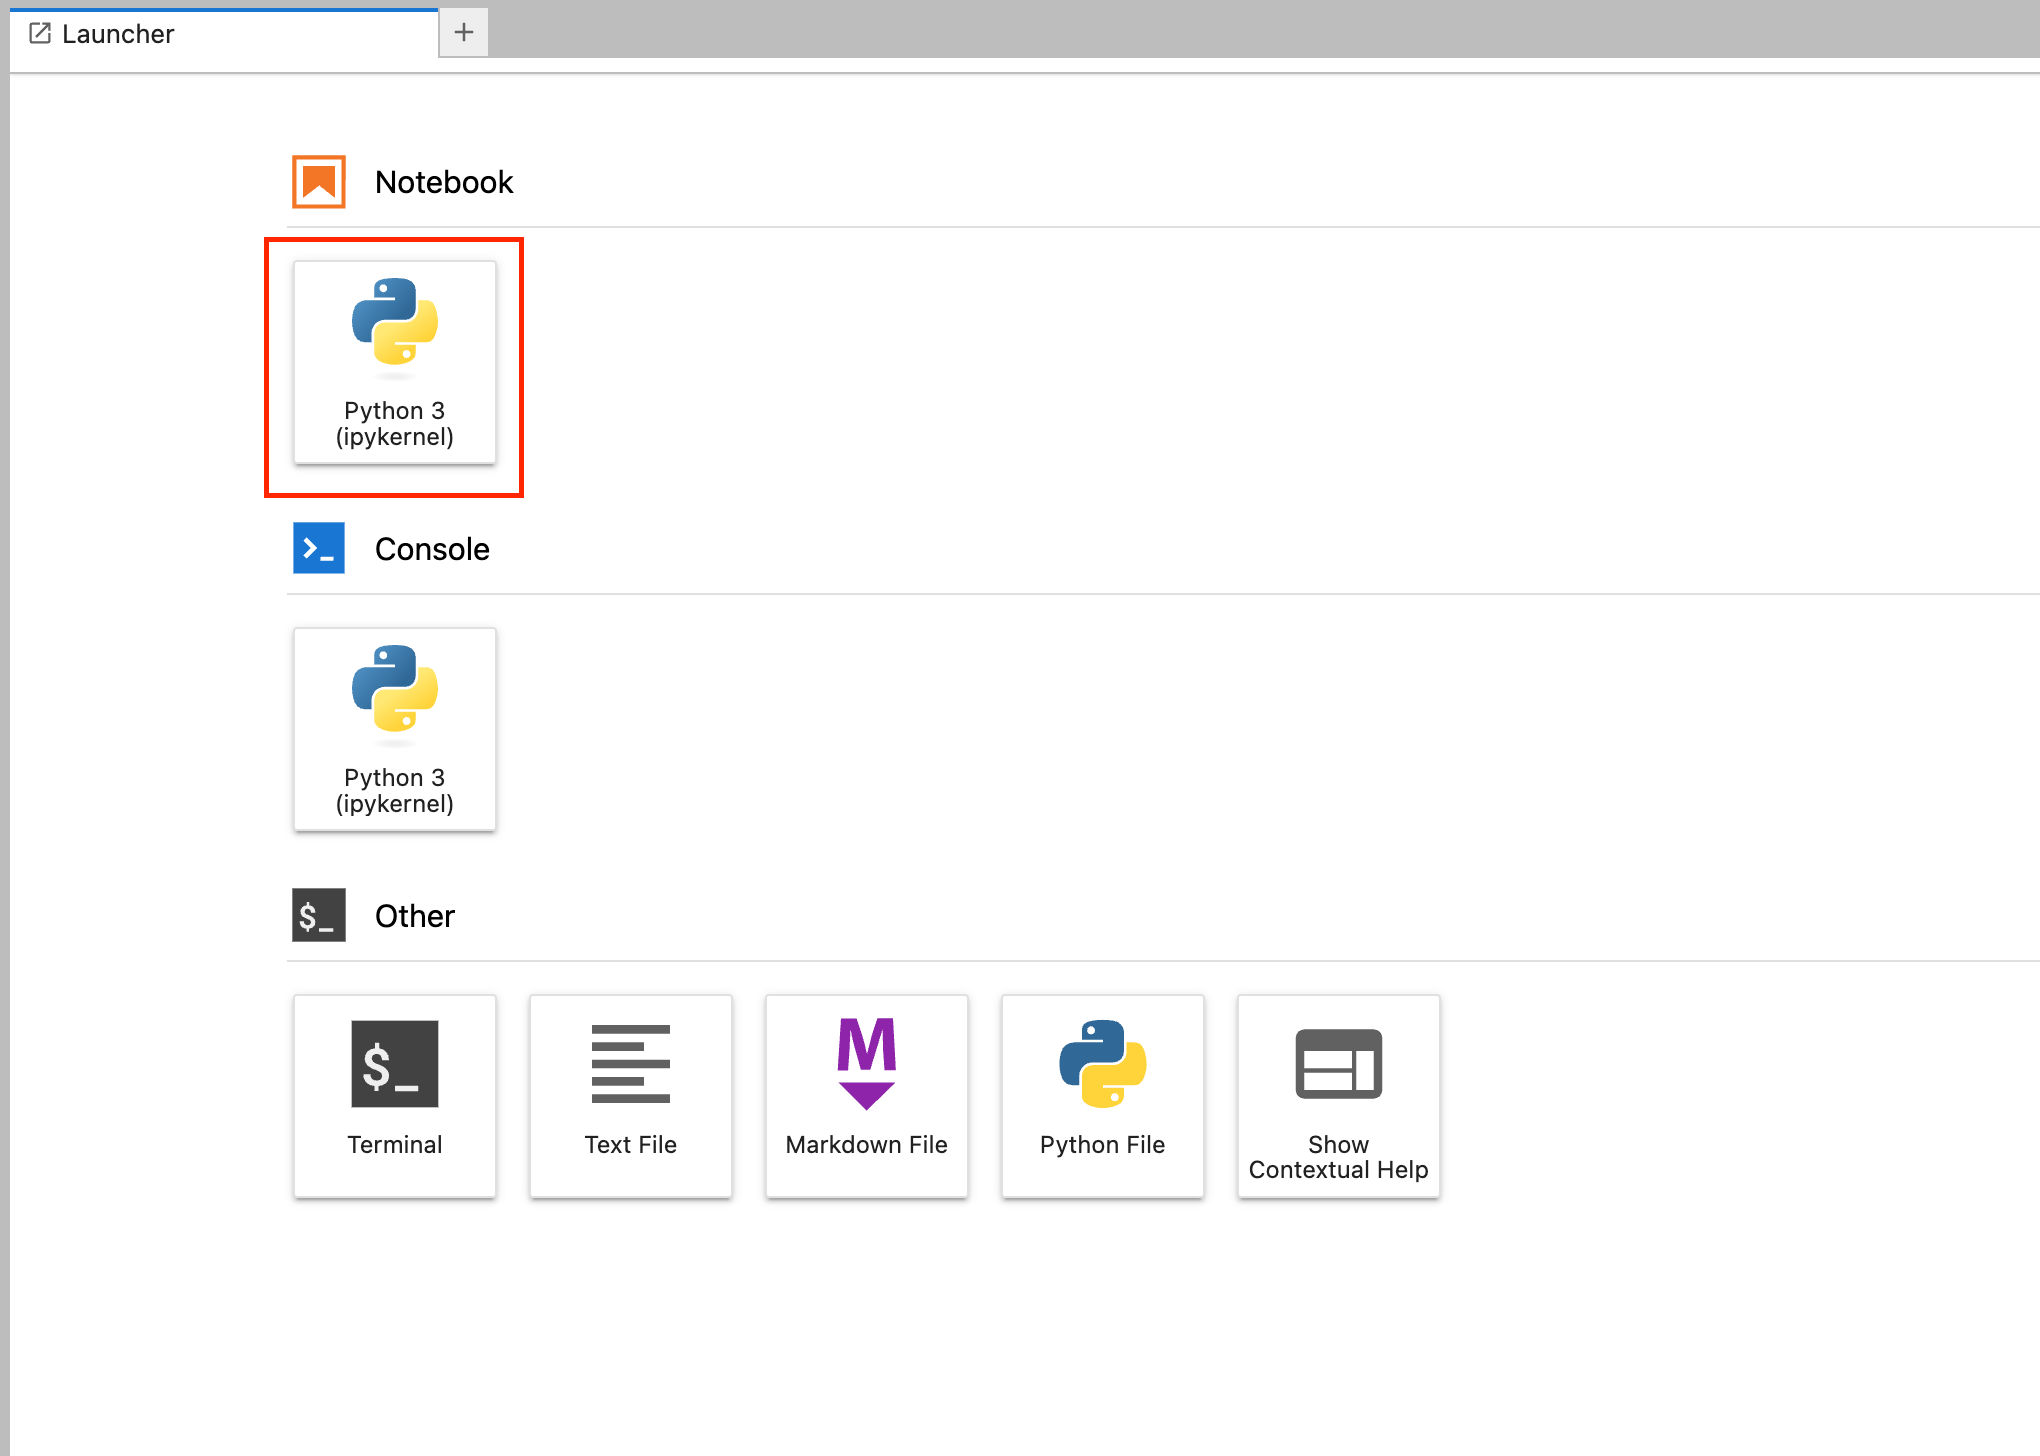
A new notebook will open called Untited.ipynb in your web browser, and you can see a bunch of text on your terminal about kernels:
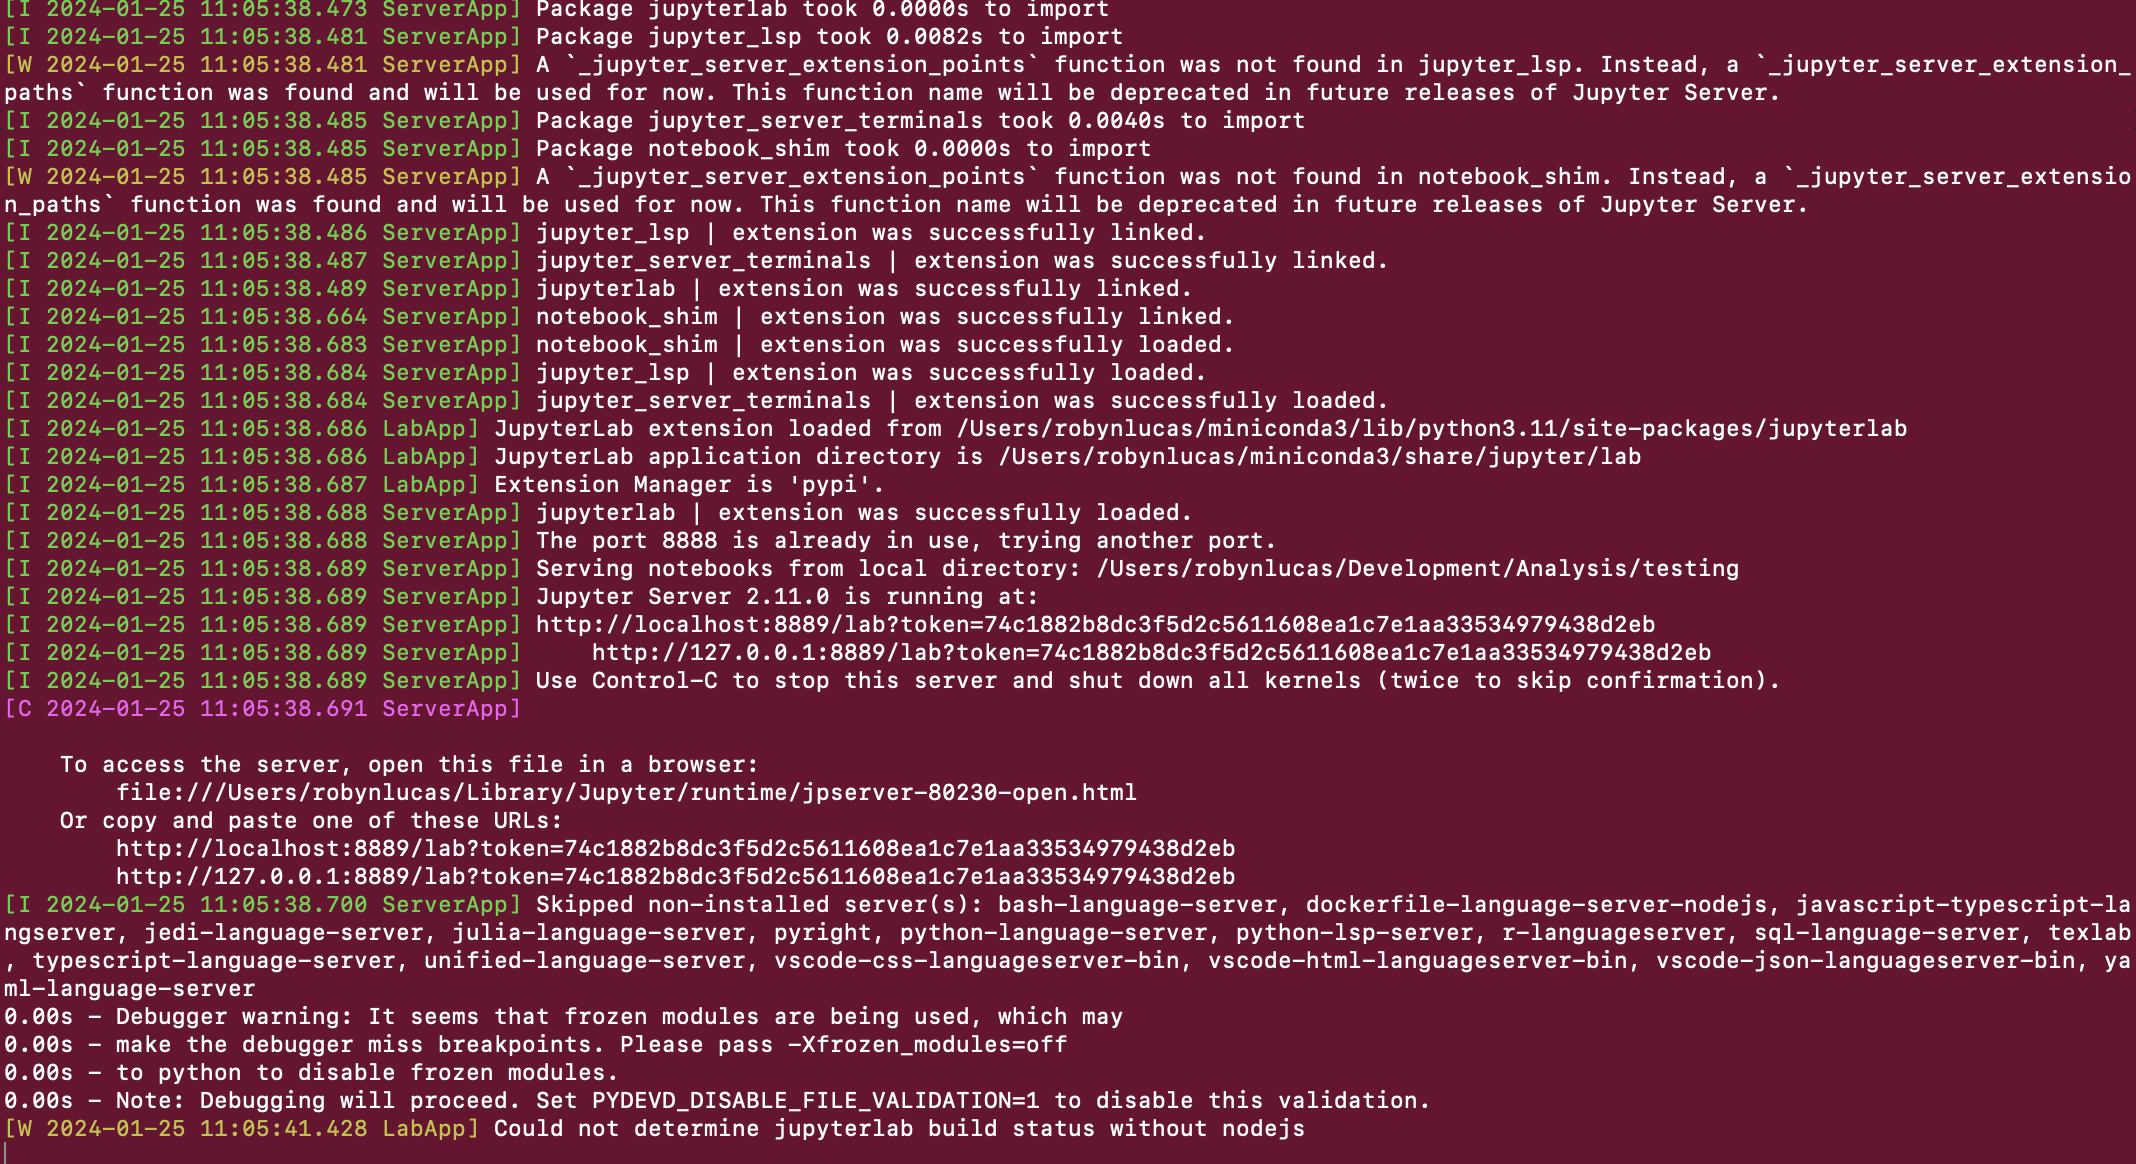

The block of text in blue is where we can write some python code to get data from the Modo API.
5. Creating an API call
We're moving away from Jupyter Lab for a second to create an API call. Refer to the Modo Energy API reference page of the endpoint you want.
Loads of the endpoints are free to use! We'll look at Modo Energy's Live System Price Reference (one of the free ones), but there are more than 200 to choose from.
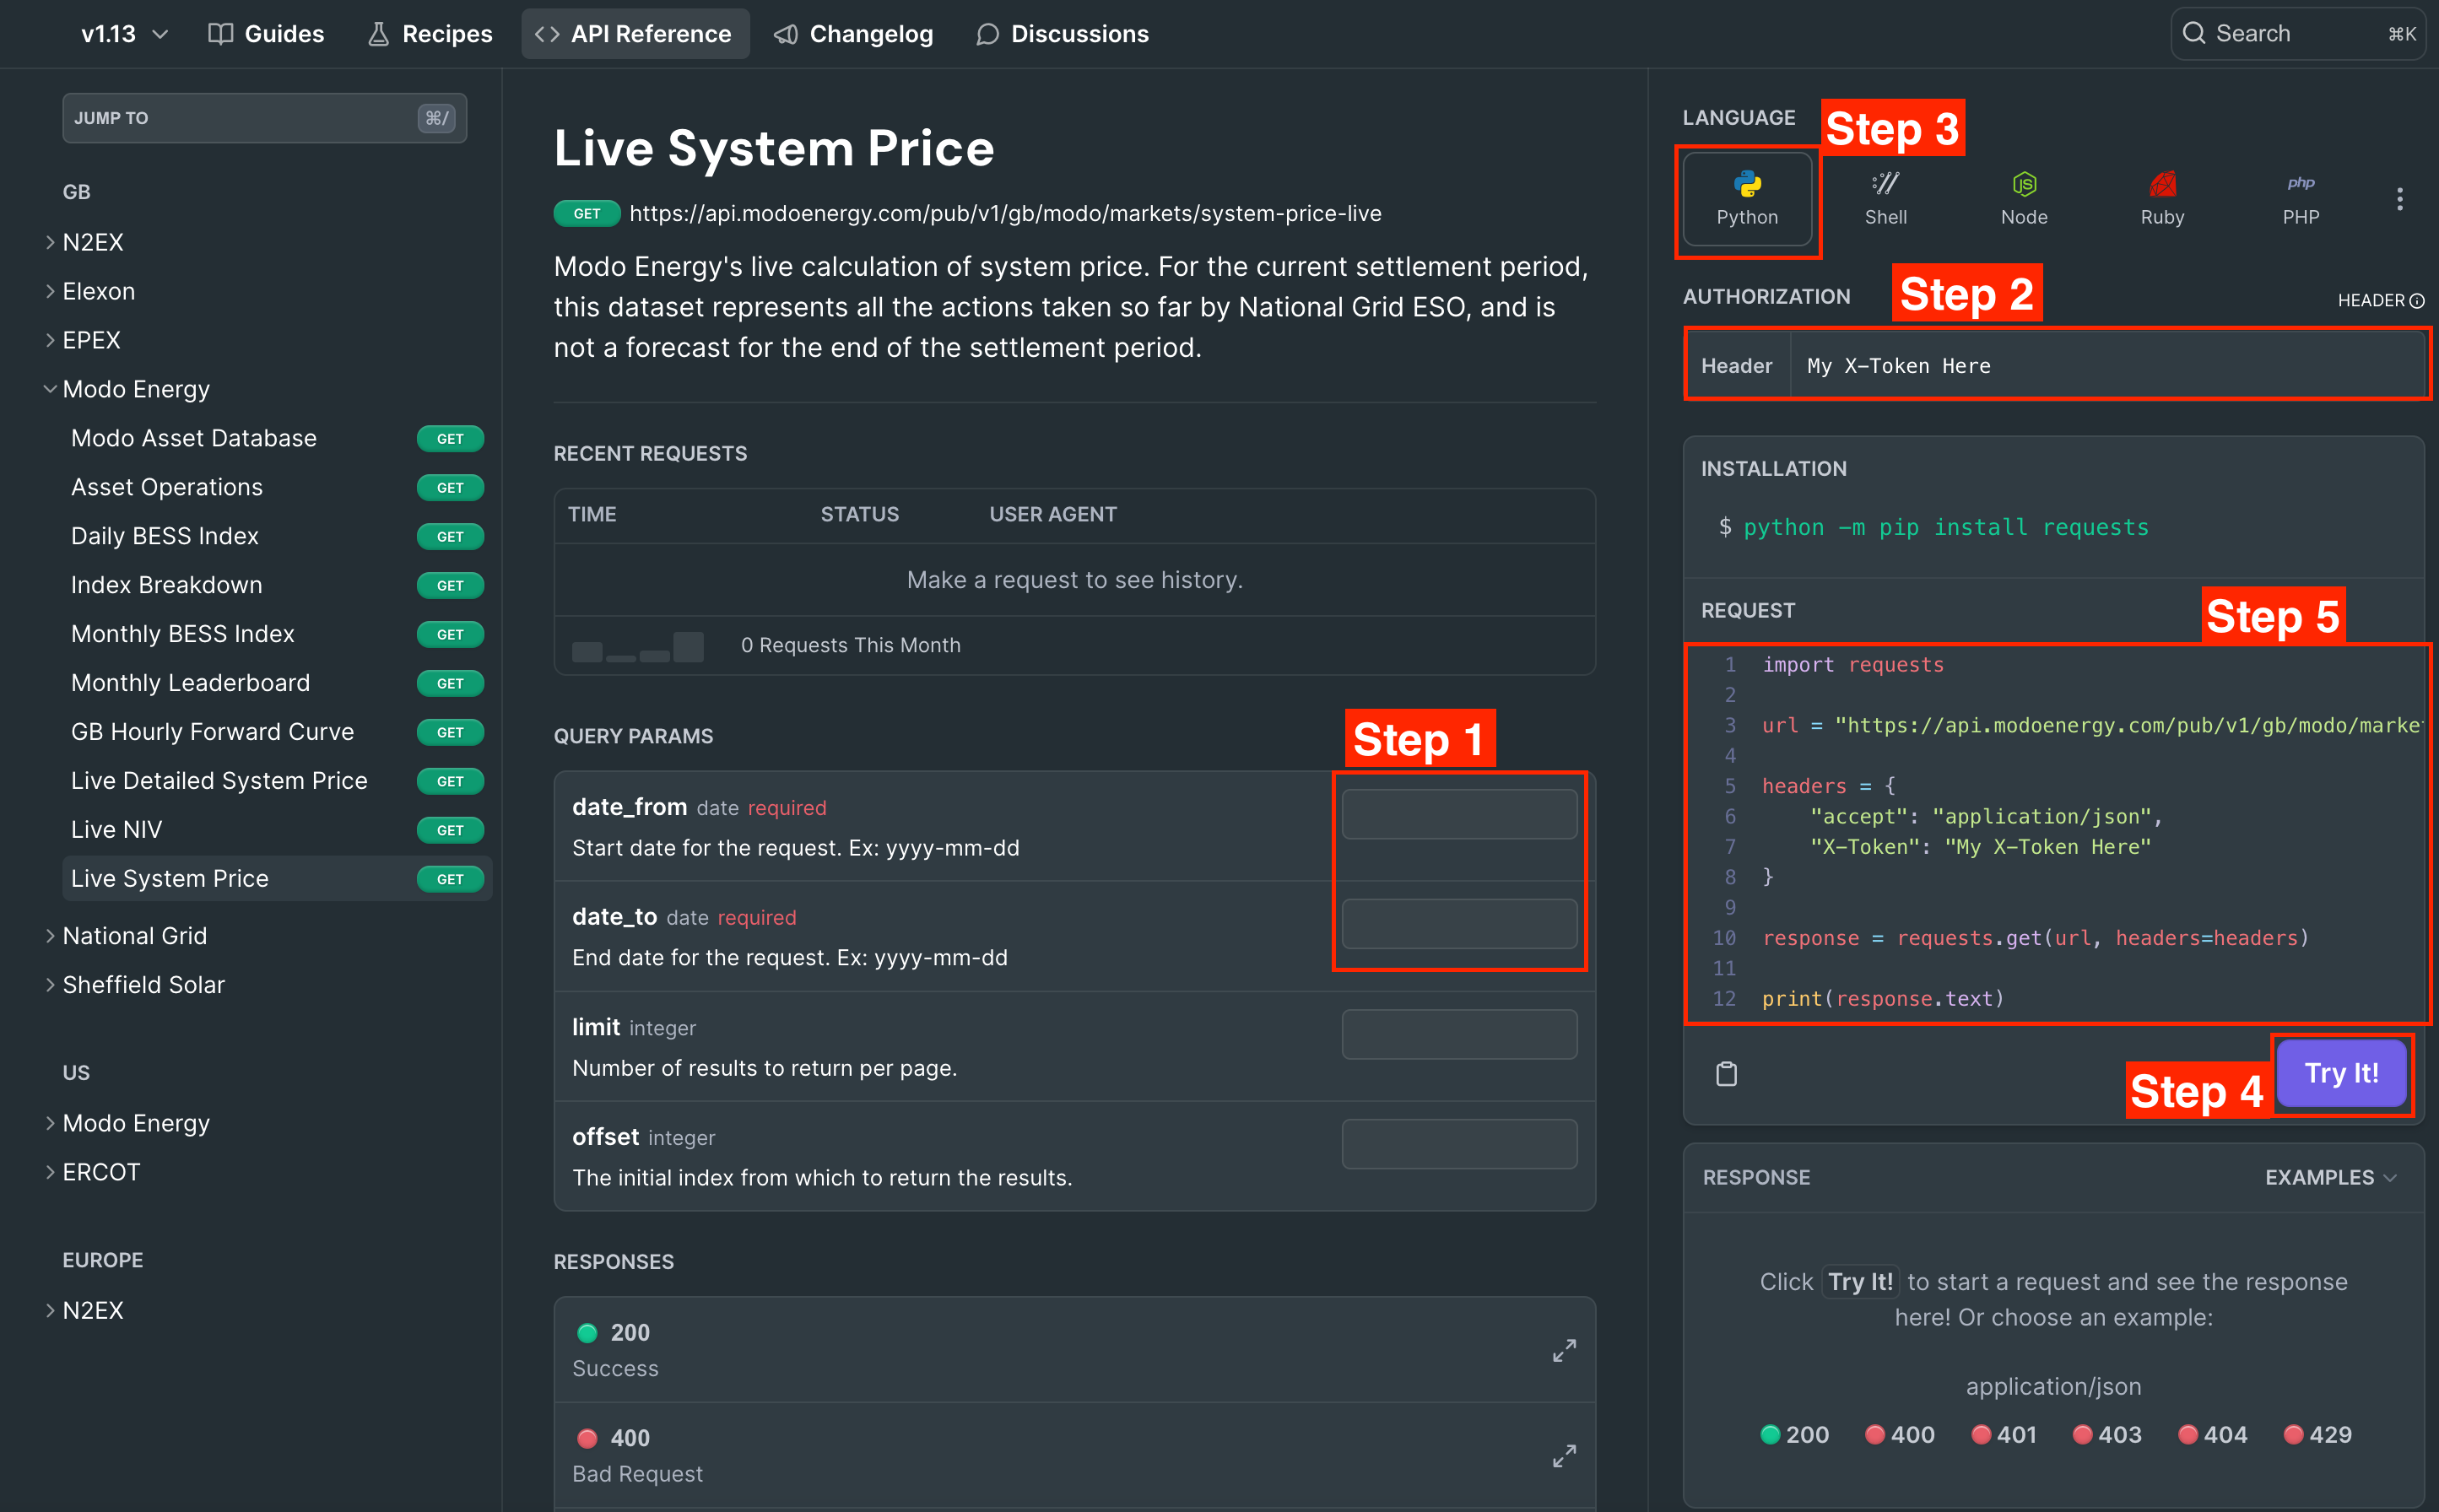
Step 1: fill in the parameters you want to specify in the boxes highlighted.
Step 2: take your X-Token from the Developers page on the Modo Energy platform . Find this here (you need to be logged in):
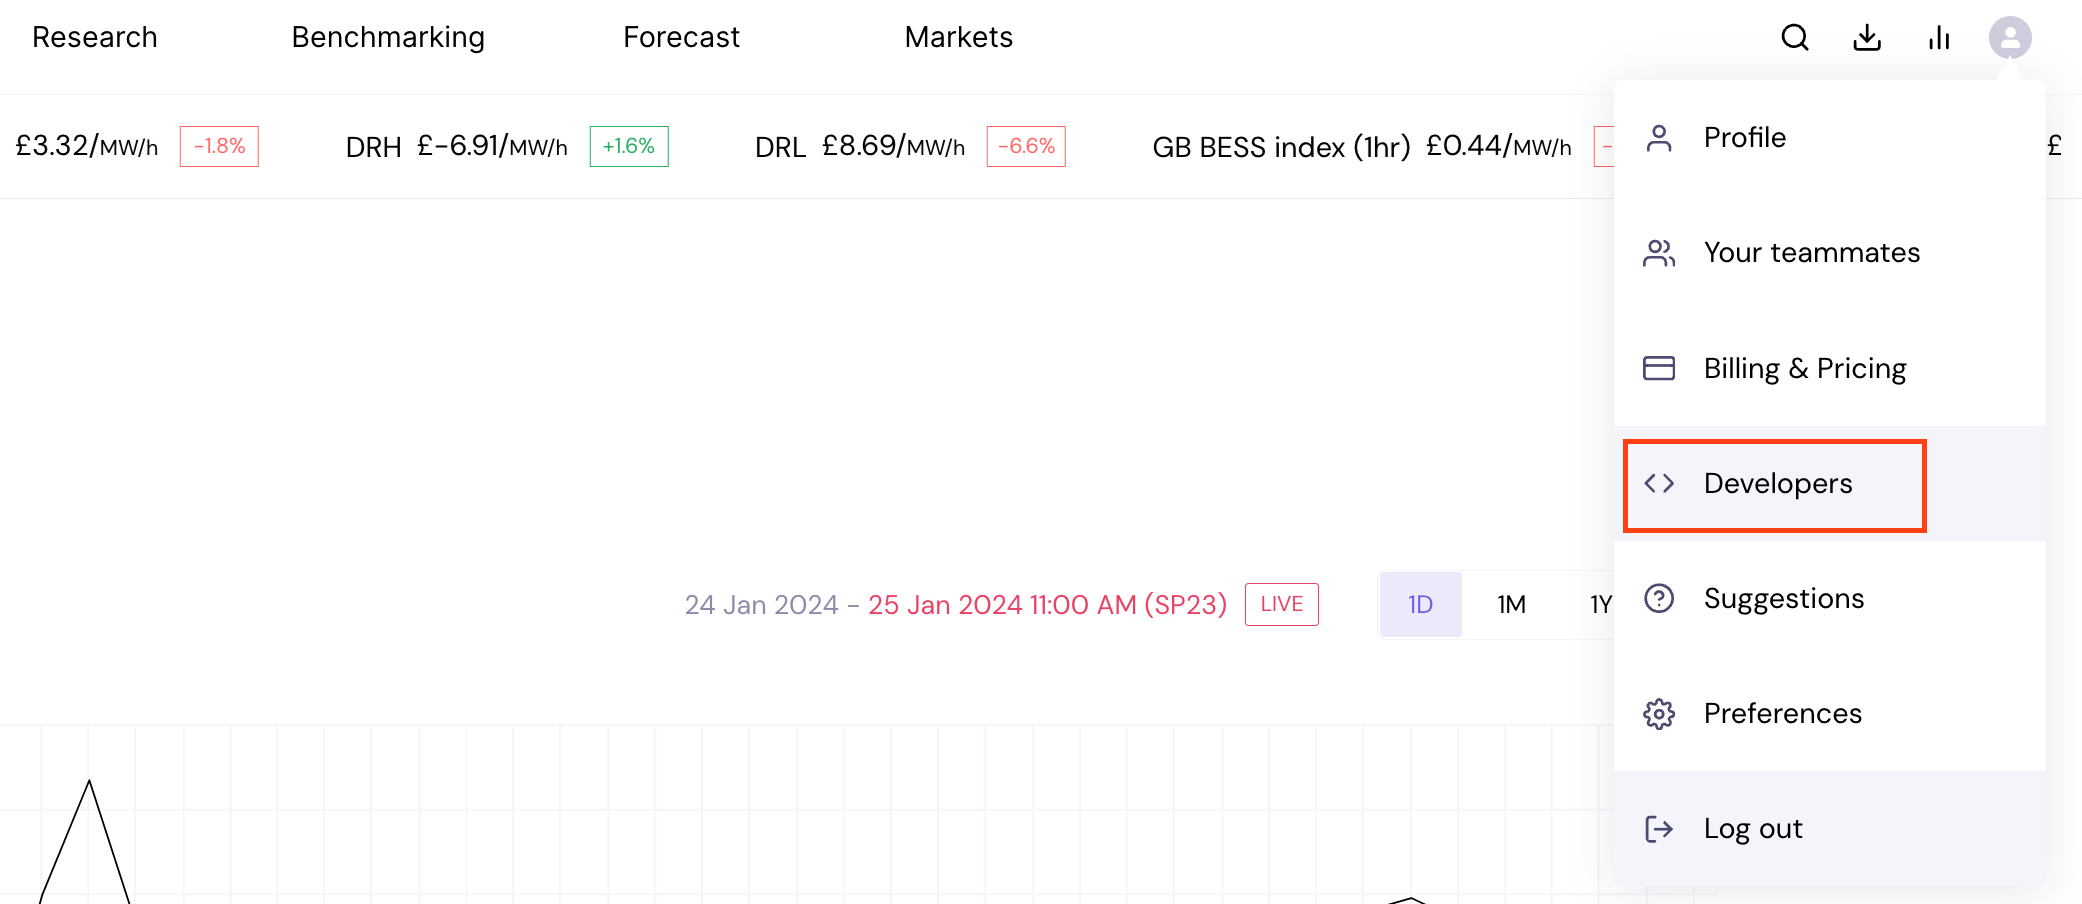

Once you've copied it, paste it into the Authorization section of the API documentation page, shown in the image above.
Step 3: Under 'Language', select 'Python'.
Step 4: If this is your first time making this call, try using the 'Try It!' button, to make sure your call works. If it works, a sample of the data will appear in the bottom-left 'response' section.
6. Calling the API from your Python notebook
Copy and paste the sample code from "request" on the left, shown in Step 5 above into a new code block on your Python notebook. Run the code block by pressing shift-enter or the triangular "play" button in the toolbar, as shown in the image below.
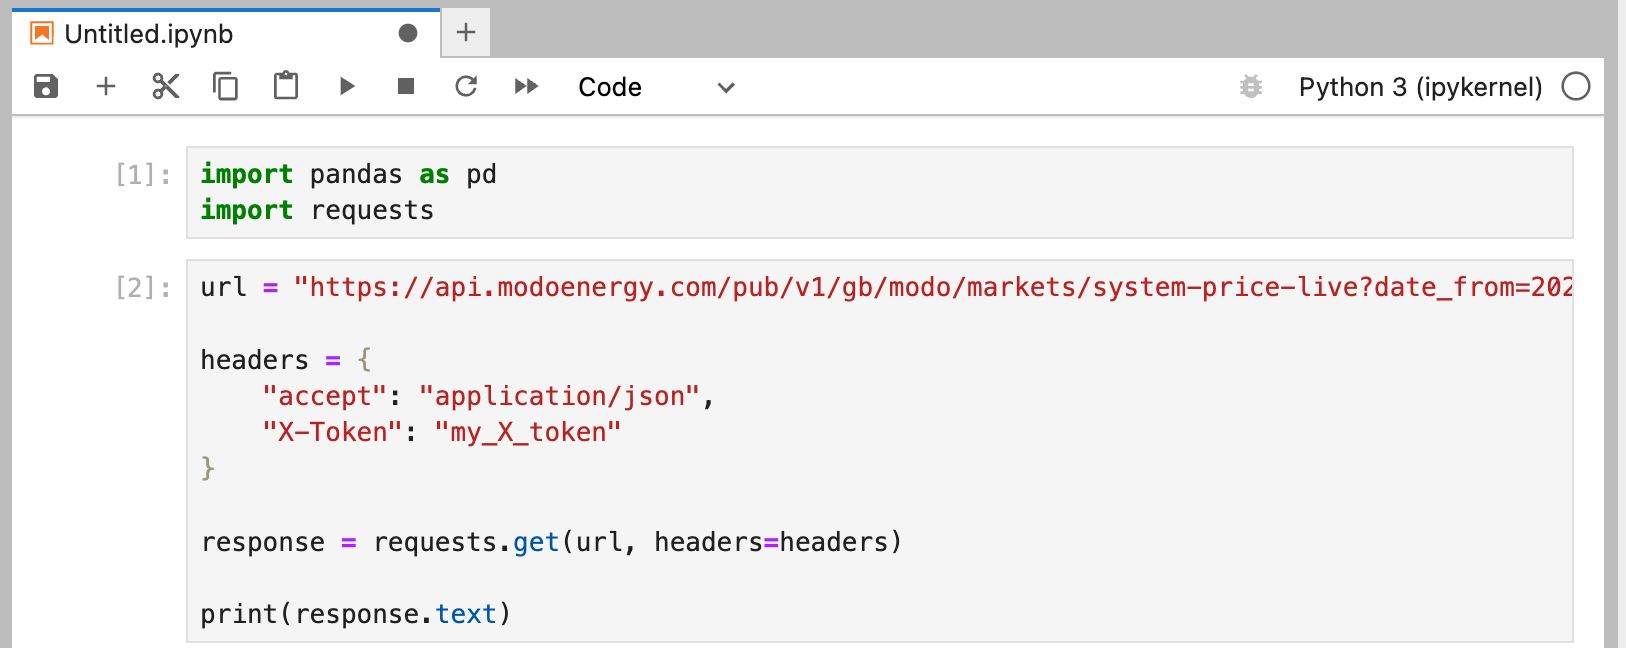
The great thing about Jupyter Notebooks is that you can run code bit by bit, and test out what things do in as small a section as you would like.
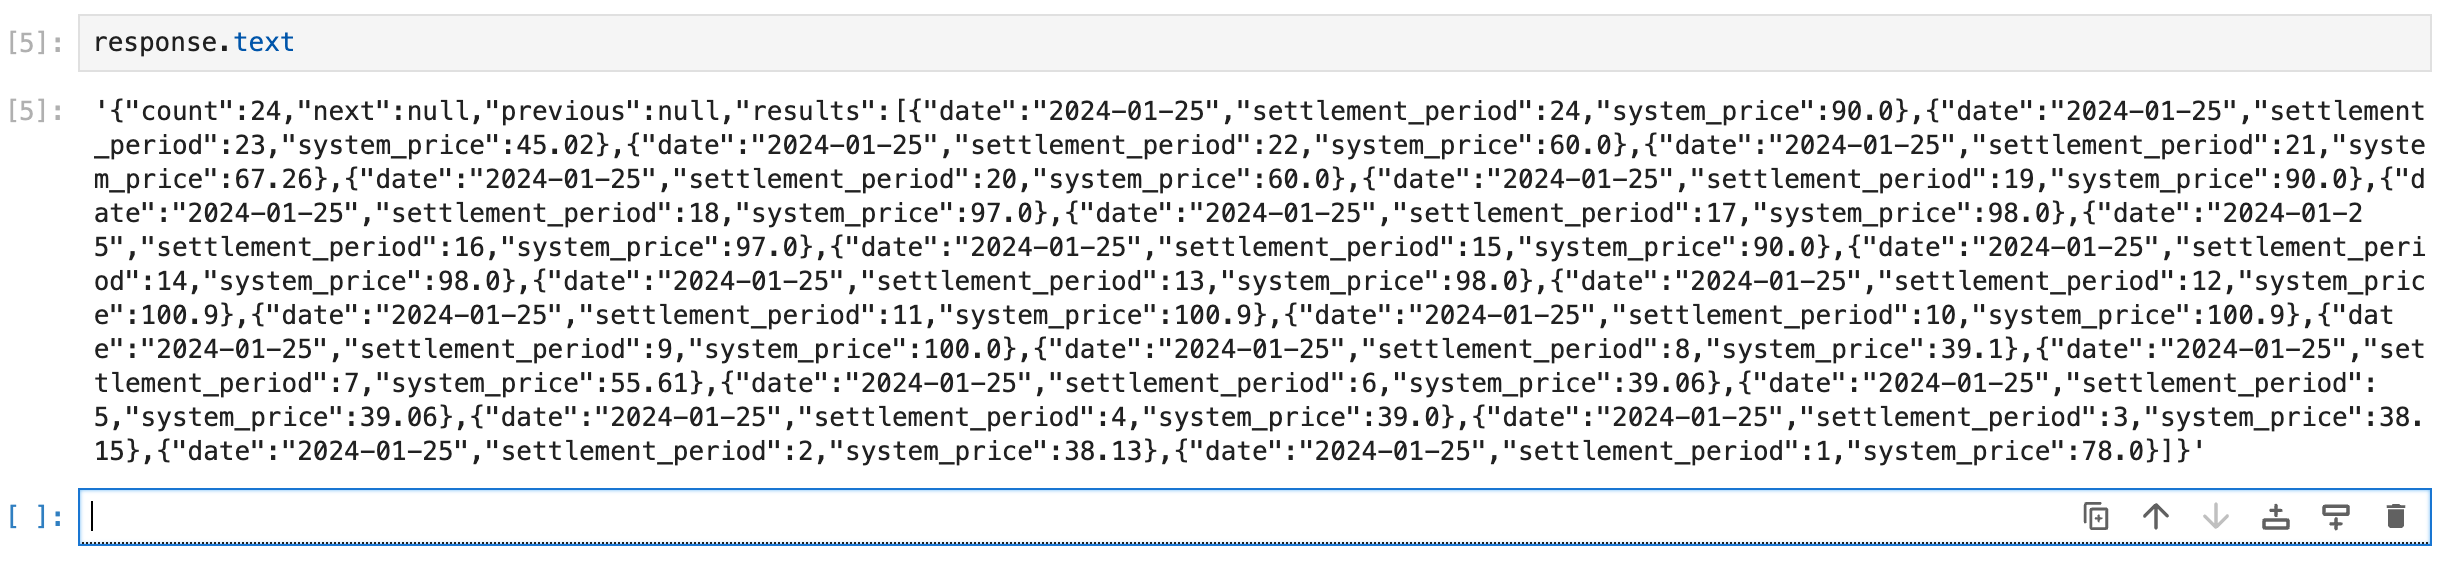
You can also see what any variable (like response.text) contains by writing the name of the variable in a cell and running that cell using shift+enter:
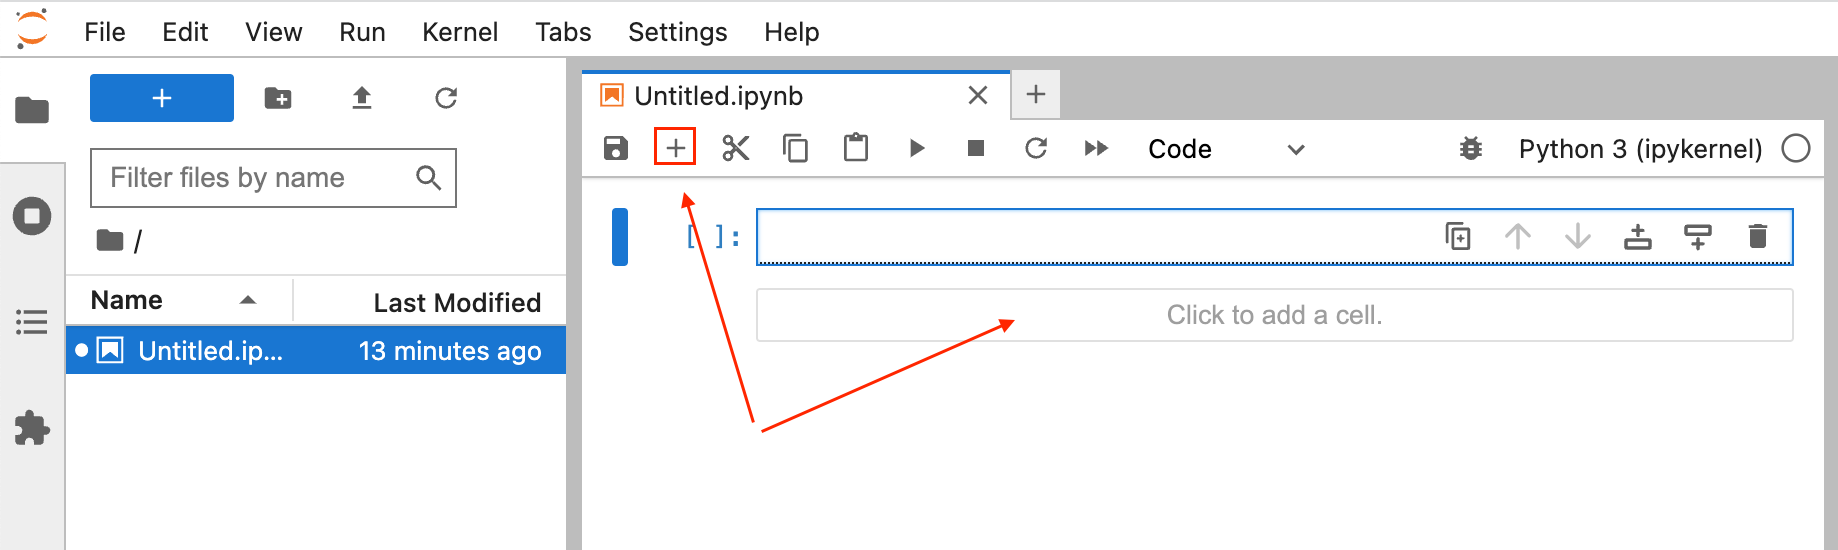
You can add more code blocks "click to add a cell" or the plus sign:
You can also skip sections, if you play them individually. To "restart" a notebook, you can click the "fast-forward" button in the toolbar to wipe the kernel's memory and run your code from the top.
Next, we look at how to take this long string of text where you can see some signs of useful data, and make it into a table using pandas.
7. Putting the data into a reasonable format & dealing with pagination
Now we will
- Request to allow for large amounts of data, using something called 'pagination'.
- Putting that data into a format that can be manipulated or processed, using
pandas.
This is where our recipe for pagination using pandas dataframes comes in, which we'll walk through below.
To help speed the response from the API up, we automatically separate into pages of 10,000 rows for most datasets. This is called pagination. To get a longer period of time (which has more than 10,000 rows of data) we have to call the API several times. (note: we are planning on changing the pagination limits to be based on the time-range requested rather purely on number of rows)
A pandas dataframe is a much more accessible format for data than text. It is similar to a CSV or a spreadsheet and is easy to manipulate and use.
Walking through some code to get frequency response data
Ensure that the below block is your first block of code.
#import the packages that you need

import pandas as pd
import requests
Fetch your X-Token from here.
#define your X-Token as a variable called modo_api_key - this is the one from the platform
modo_api_key = 'my X-Token'

#set up your headers.
headers = {
  'X-Token': modo_api_key
}
Remember, you imported pandas as pd, so whenever you refer to pandas you abbreviate to pd. First of all, we define a pandas DataFrame - a table-like object.
#set up a blank pandas dataframe, called df.
df=pd.DataFrame()
Take the URL below from the endpoint reference page, in the code shown in Step 5 that you set up with the parameters. For example, the URL below calls the National Grid Results Summary for the EAC Auction on January 19th, 2024, from this endpoint.
#define the url of your API call, which you set up previously.

url = "https://api.modoenergy.com/pub/v1/gb/modo/markets/system-price-live?date_from=2024-01-25&date_to=2024-01-25"
For the code below, make sure it's all in the same code block in your notebook.
We loop through a few url's to get each consecutive 10,000 rows. The code stops when the result of response.json()['next'] is empty.
#make sure the code below is all in the same block
#set up your while loop
while url is not None:
#call the API, using the URL you set and the headers which include your API key
response = requests.get(url,headers=headers)
try:
#the code attempts to append the data, which is converted into dataframe format
#to your pandas dataframe, df, which starts empty
df = pd.concat([df,pd.DataFrame(response.json()['results'])])
#it then resets the URL to call the next 10,000 rows.
#if there is no more data, then the url variable becomes None, and the while loop ends
url = response.json()['next']
#if calling the API in line 7 causes a KeyError by failing to work the reason for failure is printed out.
except KeyError:
print(f"Check your API token and subscription tier: response failed. Response: \n {response, response.content}")
#once the error message is printed, break out of the while loop
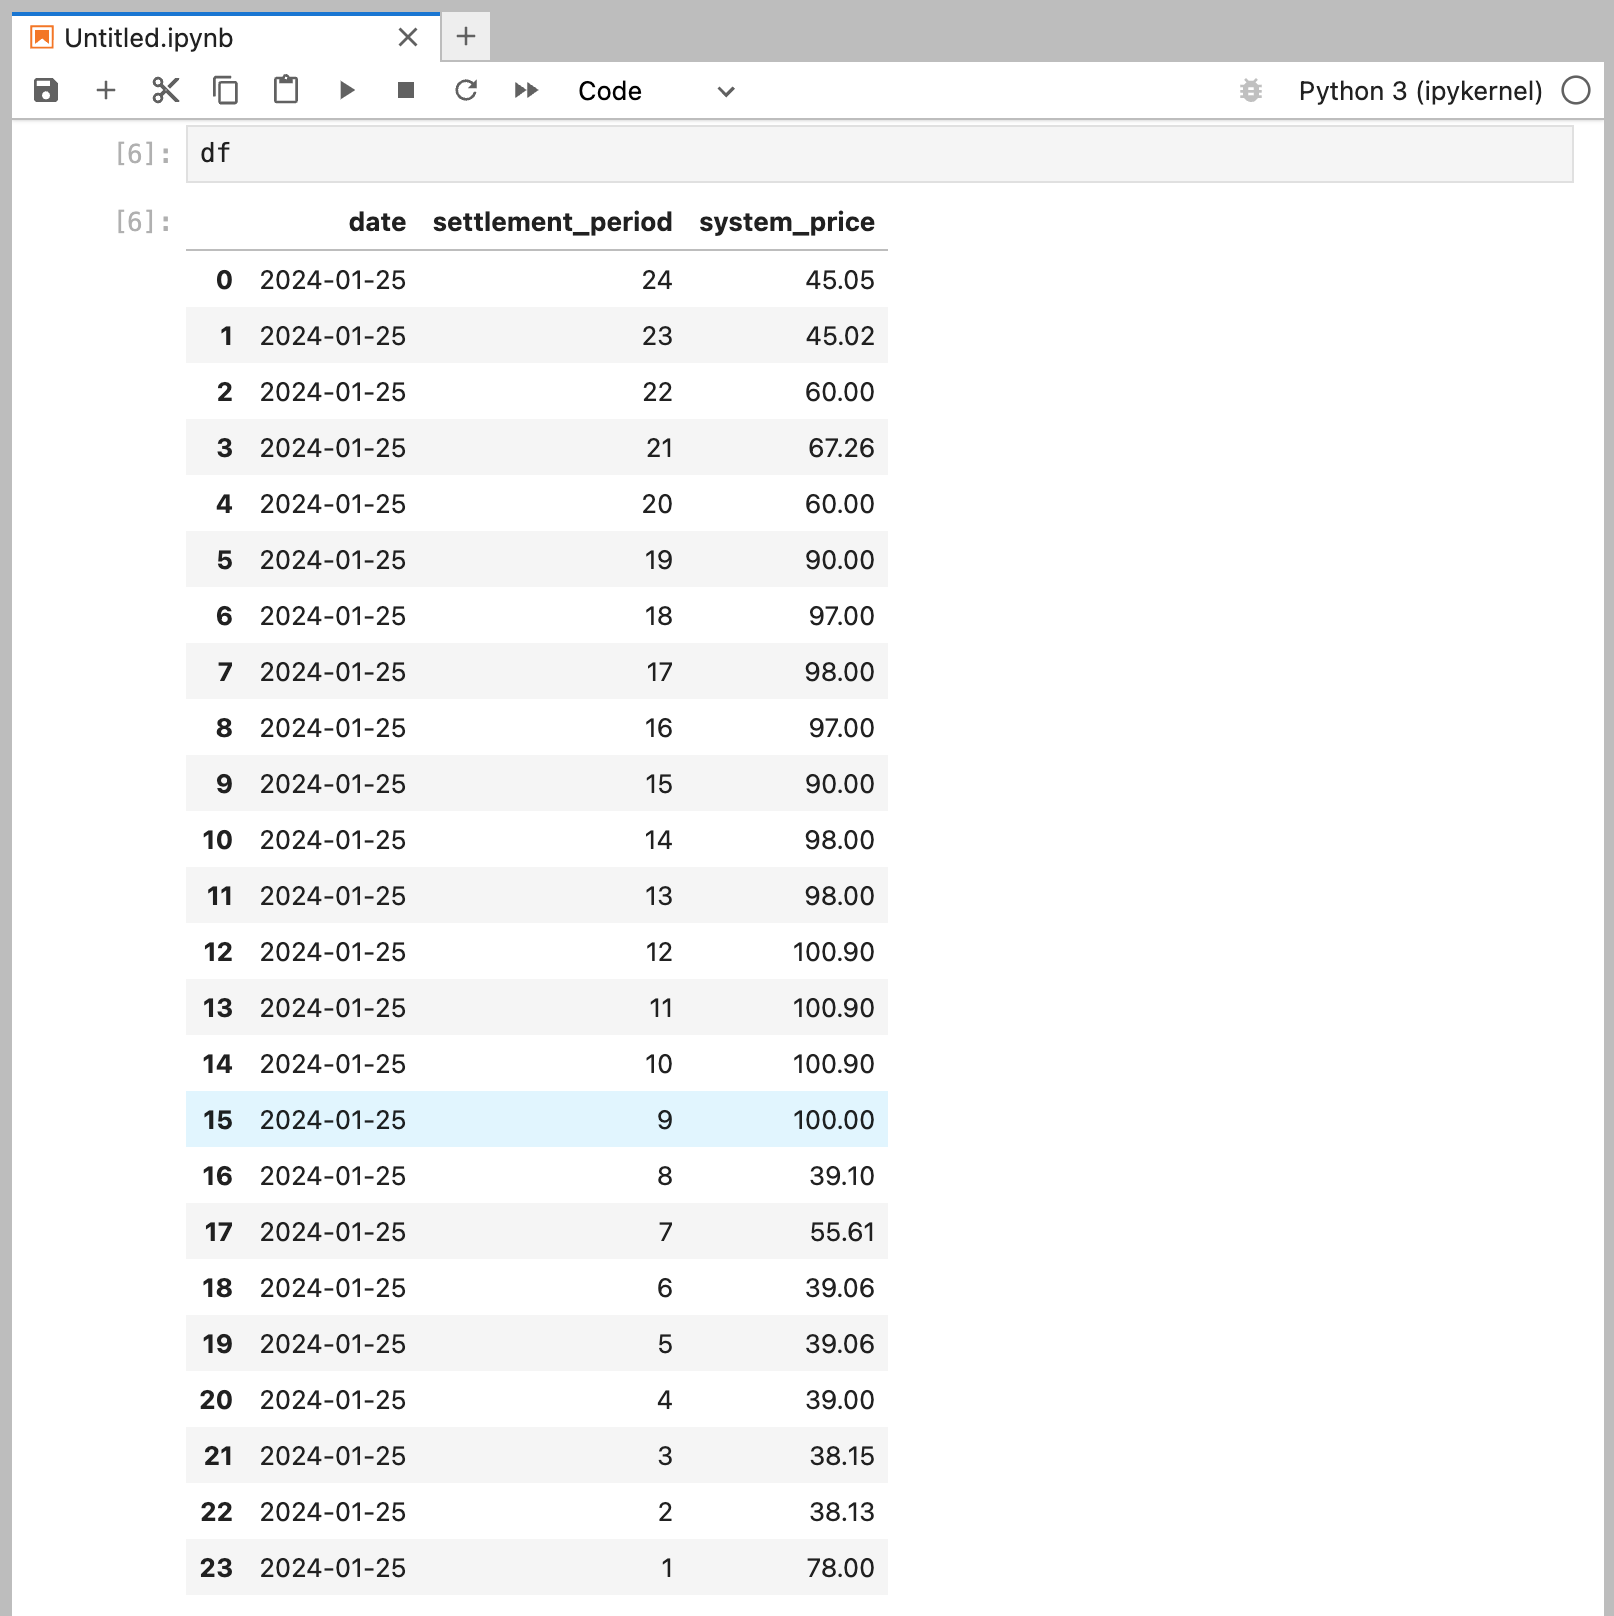
breakYou can now check you've got your data: enter df into a blank code block and run it:
What next?
You can continue to play with the data by using some of the pandas functionality - perhaps sum or average, select a subsample of the dataset, merge with another one, or resample it... the possibilities are endless. Have a look at the pandas documentation (or ChatGPT can be super helpful) on how to explore and manipulate your data.
If you want to save it as a CSV, use the code below. Ensure your CSV name has no spaces, and ends in ".csv".
df.to_csv("my_data.csv")Or, you can copy it to your clipboard, and insert into a spreadsheet:
df.to_clipboard()Have fun!
Finally...
Once you have finished with your jupyter lab notebook, you can shut down the server which runs it by going back to the terminal and hitting control + c. You'll get a prompt asking if you want to Shutdown this Jupyter server?- hit y to confirm.
Updated 9 months ago